Showing posts with label food. Show all posts

Saturday, January 29, 2011

Food 132: Lemon Bars


If there has been one treat I have loved to make lately, it has been the scrumptious dessert of Lemon Bars. Lemon Bars are great for any time of day and are surprisingly very fun to make. So gather up some friends and make plans to make this great recipe!


Level: Easy
Cook Time Total: 1 hour
45 Minutes (for cooking)
15 minutes (for preparing)


Makes: up to 16 bars


Ingredients for Filling:
  1. 4 eggs
  2. 2 cups granulated sugar
  3. 6 tablespoons all-purpose flour
  4. 6 tablespoons fresh lemon juice


Ingredients for Crust:
  1. 2 cups all-purpose flour
  2. 1 cup confectioners' sugar, add a little more for dusting
  3. Pinch of salt
  4. 2 sticks butter, (at room temperature), add more for greasing
Instructions:

  1. Preheat oven to 350 degrees F.
  2. Lightly grease a 9 by 13 by 2-inch pan.
  3. Make the crust by combining the flour, confectioners' sugar, and salt in a large bowl.
  4. Cut in the butter to make a crumbly mixture.
  5. Press the mixture into the prepared pan. You may need to dip your fingers into a little flour or confectioners' sugar to keep the dough from sticking to your fingers.
  6. Bake for 20 minutes.
  7. Meanwhile, to make the filling, mix the eggs, granulated sugar, flour, and lemon juice.
  8. Pour this over the baked crust and bake for 25 minutes longer.
  9. Sprinkle with confectioners' sugar, if desired, when the bars are done.
Hope you get a chance to enjoy this delicious treat! Enjoy.

Recipe courtesy of Food Network.

Thursday, November 11, 2010

Food 121: Harry Potter Month (Cauldron Cakes)


Last month was treats for the month of October and that went pretty well if I do say so myself. Traditionally you'd do Thanksgiving treatsin November, but the nerd I am had a better idea. This month the first part of the final Harry Potter film comes out and what better way to countdown than to post a popular Potter recipe each week? Awesome right? Seeing that I was in a Harry Potter club a few years back and got to try all the great recipes (Butterbeer anyone?) I like to think I am a little bit experienced in these recipes. Even if you are not a fan of the books you will love these recipes!

*Before we start there are many variations of these recipes online but I picked the ones I've either tried or that looked the yummiest. Up this week are Cauldron Cakes, which can be changed to be chocolate. The vanilla one is better though if I do say so myself.

Overall time: 35  minutes. (10 to prep and 35 to bake).
Serves: 21 small cakes

Ingredients:
1. 1 1/2 cups of flour
2. 3 /12 teaspoons of baking powder
3. 1 teaspoon of salt
4. 1/2 cup of softened butter or 1/2 cup of softened margarine
5. 1 cup of milk
6. 1 teaspoon of vanilla extract
7. 3 eggs
8. 3/4 teaspoon cinnamon
9. 1/8 teaspoon of ginger

Directions:
1. Preheat oven to 350 degrees.
2. Mix eggs, sugar, butter/margarine, cinnamon, ginger, and vanilla in a mixing bowl (large) on whip for about 2 minutes.
3. Mix the other solid ingredients and milk gradually in the large mixing bowl.
4. Put batter in muffin tins (not too high, these are supposed to look flat). bake for 25 minutes.
5. You can decorate with sprinkles, powder, or frosting after if you please. These cakes go well with honey too.
6. Enjoy!

Any requests or comments? If you tried this recipe did you like it? I love to hear your feedback!

Thursday, October 21, 2010

Food 118: October Treats (Caramel Puffs)


Going into the third week of October recipes and still going strong! You can probably tell by now I  have a sweet tooth but don't worry, November is more of a meal kind of month with less desserts. This week I have a super easy one that might not sound so great but trust me they are. The tastes of all the things put together makes a tasty explosion in your mouth that you wouldn't believe! Crunchy, soft, salty, sweet and much more this is something you have to try! The best part? It takes about five minutes!

Serves: As many as you want!
Cook Time: 5 Minutes

Ingredients:
Marshmallows
Pretzel sticks
Caramel
Melting Chocolate

The Process:

Dip marshmallows halfway into the warm caramel. Let the excess drip off, then dip in crushed pretzels and place on a lightly oiled parchment-lined baking sheet until set. Drizzle with melted chocolate.

See? Easy enough. Enjoy! Any thoughts on recipes? I'd love to hear them!

Thursday, October 14, 2010

Food 117: October Treats (Caramel Apples)


Okay, I'd be lying if I said it was easy finding the next recipe for this month. There are so many different levels of cooking and so many themed recipes to pick from. I couldn't pick something too hard or complicated but I didn't want to make something too easy. I finally found Caramel Apples though and they're perfect. They might  be a little easy but  I think it'd be the perfect thing to make with friends! You might think it sounds easy but the fun part is making the caramel!


Cook Time: 15 mins. 
Serves: 6


Ingredients
2 cups of sugar
1/4 cup of light corn syrup
1/2 cup water
1/2 cup of heavy cream  
cooking spray
2 tablespoons of unsalted butter
1 teaspoon of vanilla extra
pinch of salt
apples (6)
6 sticks (cooking ones)


Instructions: 


Mix 2 cups sugar, 1/4 cup light corn syrup and 1/2 cup water in a small saucepan. Bring to a boil over medium-high heat, stirring just until the sugar dissolves. Cook, swirling the pan (do not stir), until the mixture is light amber and a candy thermometer registers 320 degrees, 8 to 10 minutes. Remove from the heat; slowly whisk in 1/2 cup heavy cream, then 2 tablespoons unsalted butter, 1 teaspoon vanilla extract and a pinch of salt. Return to low heat and whisk until smooth. Let cool until the caramel is thick enough to coat a spoon. Insert sticks into the stem ends of 6 apples and dip the apples into the caramel, letting the excess drip off. Roll in toppings if desired, then let cool on a parchment-lined baking sheet coated with cooking spray.


Enjoy! 

Thursday, October 7, 2010

Food 116: October Treats (Pumpkin Parfaits)


Okay, maybe it's just me but when October comes around it's all about October foods.  I decided that because of that, I'll post a new October themed recipe each week. If you end up liking this month's posts, then when I write food posts for other months, I will also make seasonal food themes. This weeks is a sweet treat of pumpkin parfaits. 


Time: 25 minutes to make
Serves: 6


Ingredients: 

  • 13 gingersnaps, chocolate wafers or graham crackers
  • 1 tablespoon unsalted butter, melted
  • 3/4 cup plus 1 tablespoon confectioners' sugar
  • 1/2 cup canned pure pumpkin
  • Pinch of freshly grated nutmeg
  • 1/2 cup white chocolate chips
  • 2 cups cold heavy cream
Directions: 

Put 7 cookies in a sealable plastic bag and crush into crumbs (with pans, hands, whatever you desire). Brush the bottoms and about 1 inch up the sides of 6 parfait glasses with butter. Add about a spoonful of crumbs to each and roll them around the insides of the glasses; pour out the extra crumbs and reserve for topping. Refrigerate the prepared glasses.
Put 3/4 cup confectioners' sugar, the pumpkin, and the nutmeg in a food processor. Pulse until smooth, about 1 minute.
Put the white chocolate chips in a microwave-safe bowl and microwave at 50% power until melted, about 1 minute, stirring halfway. Add to the pumpkin mixture and process until combined. Put into to a large bowl.
Beat 1 /12 cups cream in a bowl with a mixer until soft peaks form; fold into the pumpkin mixture until smooth. Divide among the prepared glasses and refrigerate until ready to serve.
Beat the remaining 1/2 cup cream with a mixer until foamy. Add the remaining 1 tablespoon confectioners' sugar and beat until soft peaks form. Top the parfaits with the whipped cream, reserved cookie crumbs and the remaining 6 cookies.

Hopefully you will enjoy this fun October recipe on one of these cold nights! Something like this is always a good idea for parties too!

Thursday, September 9, 2010

Food 112: Banana Bread


Maybe it's just me but making bread is super fun and useful. One loaf of any bread could be used for an item for any meal. Bread is a food essential, so why not spice it up (or should I say sweeten) it up a little? 


Cook Time: 1 hr 10 min (prep time 2 hr).
Makes: One Loaf

Ingredients

  • 1 cup granulated sugar
  • 8 tablespoons (1 stick) unsalted butter, room temperature
  • 2 large eggs
  • 3 ripe bananas
  • 1 tablespoon milk
  • 1 teaspoon ground cinnamon
  • 2 cups all-purpose flour
  • 1 teaspoon baking powder
  • 1 teaspoon baking soda
  • 1 teaspoon salt

Directions

Preheat the oven to 325 degrees F. Butter a 9 x 5 x 3 inch loaf pan.
Cream the sugar and butter in a large mixing bowl until light and fluffy. Add the eggs one at a time, beating well after each addition.
In a small bowl, mash the bananas with a fork. Mix in the milk and cinnamon. In another bowl, mix together the flour, baking powder, baking soda and salt.
Add the banana mixture to the creamed mixture and stir until combined. Add dry ingredients, mixing just until flour disappears.
Pour batter into prepared pan and bake 1 hour to 1 hour 10 minutes, until a toothpick inserted in the center comes out clean. Set aside to cool on a rack for 15 minutes. Remove bread from pan, invert onto rack and cool completely before slicing.
Spread slices with honey or serve with ice cream.
----
So try this out and enjoy! If you like it and want any other cool recipes just comment. The possibilities are endless. Want a recipe for something else? Do tell and thanks for reading!

Thursday, August 26, 2010

Food 110: Back To School Bento

There's nothing I hate more than a soggy sandwich. PB & J, Turkey, Veggie, it's all the same gross nasty-ness after a few hours.

For years I have been searching for the perfect home made lunch combo that will not only taste good, but not look like the largest man on earth has sat on it. It's hard. But fear not, I'm here to share some of my boxed secrets to a yummy lunch.

First, dump that crummy, non tree friendly paper bag in the recycling bin and head over to your nearby store and pick up something reusable. Cookies, sandwiches, juice boxes, etc. are are somewhat crushed or banged up by lunch time, and if you packed something cold in there, chances are you're bag is soggy too. Buy tin, plastic, or wood boxes, they all do the same job. Personally, I like using something small, yet big enough for me to have 3 or4 compartments for different foods. Small, well sealed plastic containers are great to have also for sauces or dips. While paper bags are really convenient, and of course a classic, they aren't really that practical, so end whatever kind of relationship you have with paper baggies and splurge on something a little more durable and heck, even cute.

Once you have your reusable container consider next what you'll be packing. Traditionally meals consist of 1 main hearty protein, and 2 supplementary sides. When packing for lunch consider what the highlight of your lunch will be. Pasta, rice, tofu, meat are some of the few things you can consider. With sides you can get colorful and creative.Ok, so maybe you don't have time to be that creative in the morning or the night before, but choose colorful foods like dried cranberries, sliced carrots, strawberries, even little clementines to give your eyes a little candy while you eat. And if you want to try something a little less greasy than potato chips check out Melba Toast. However if you do decided to try Melba Toast I recommend packing some sort of spread to go along with it because they are VERY dry.

Another thing you can do is make a mini parfait. Get some yogurt, fruit, and granola if you like that extra crunch, layer them in a small container, then put in the freezer overnight. By the time you get to lunch they'll have thawed, but still be cold, yummy, and ready to eat.

To substitute for a sandwich, pinwheels are a great thing to consider. And honestly, anything you can put on bread you can put on a tortilla. Roll up anything from a yummy cream cheese and meat combo to a diced banana and nutella, or even make a fluffer nutter, the combinations are endless!

So please, with all of these ideas hopefully you'll be convinced to leave paper baggies for something a little more food friendly.
Thursday, August 19, 2010

Food 109: Nutella


Look up synoynms for the word "delicious", and Nutella should be one of them. I don't precisely remember when or how I first discovered the absolute amazingness that is Nutella Hazelnut Spread, but thank goodness I did, cause I can't imagine my life without it. Haha, okay okay, so maybe that is exaggerating a bit, but my fellow Nutella enthusiasts understand what I'm talking about, right? And if you have never tried Nutella, I implore you, run out to your nearest grocery store and buy some, and I'd bet my bottom dollar that you'll enjoy it. I mean, what's not to like? Sure, Nutella is probably the last thing that you should consume if you're trying to watch your weight, but a little bit every once in a while can't hurt... right?

I've found that Nutella goes very well smothered on a piece of toast for a peanut butter, banana, and Nutella sandwich. That's definitely one of my guilty pleasures. It goes great with strawberries, too. Mmmm. But really, there are about a gazillion and one different scrumptious ways that Nutella can be incoroporated with other foods to make some extremely tasty treats. Nutella combined with graham crackers, bagels, pancakes, waffles, french toast, crepes, cookies, brownies, poundcake, cheesecake, donuts, cupcakes... basically the list is endless, so is there any real need for me to go on? You could probably spread some Nutella on just about anything and it would be scrumdiddlyumptious. Just feast your eyes on some of these mouth watering creations:


Or, you can just grab a spoon and eat it straight out of the jar! That always works.... :)

Thursday, August 12, 2010

Food 108: The Magic of Green Tea

According to Google, Cable TV, and every health nut out there, antioxidants are the new "it" things. More specifically, green tea has taken the stage as the everyday alternative to unhealthy sodas and juices loaded with sugar. Most of the time these health fads are pushed by large companies just trying to make some money out of our hypochondriac society, but green tea honestly does have some good qualities.First of course the obvious fact that it contains a very powerful antioxidant called epigallocatechin-gallate (EGCG) which to put things into perspective, is stronger than Vitamin E and C. Recent studies have shown that EGCG can slow the growth of cancer cells!

Green tea is also known to boost your metabolism and help you loose weight, as well as calm you down after a stressful day. And believe it or not green tea can help protect your teeth!

While green tea is great to drink it's wise to watch where you're getting your tea, and what all you put in it. Some companies load their teas with so much sugar that it's almost as bad as drinking lots of soda.

If you drink pre-sweetend bottled tea take a good look at the nutrition label on the back. The calorie count can range anywhere between 80 - 160 calories per serving. It's best to brew tea at home that way you won't have to deal with preservatives and excess sugar. Sweetening your tea with regular granulated sugar is ok, but be cautious of how much sugar you add to it. Personally I find it to be tastier if I add a spoonful of honey and a bit of lemon to my tea.

Also if you brew it at home you can save you're tea bags or left over tea to make facial masks or exfoliants. It's a very cheap and eco-friendly way for you to have smooth and healthy skin. Here are some super simple recipes that I usually use when making masks and exfoliants:

For the mask you will need:

Leftover tea bags
Any leftover tea liquid
Powdered milk, or Oat meal

All you have to do is open the tea bags and mix them with either the powdered milk, or oat meal that you turn into a powder using a food processor. To get your desired consistency you can add any leftover tea or even some warm water to the mix and just apply it like you would any other facial mask. It'll make your skin feel reaaaallly smooth and soft.

For the exfoliant you will need:

Leftover tea liquid
Around 3 or 4 tbs of sugar

The beauty of this is just mixing the two together. It really doesn't matter what type of sugar you use, and you can add even more sugar depending on what type of texture you want. It's best to use lukewarm tea so it won't melt the sugar, and you can even mix the leaves from the bag in, but I prefer just using sugar and the liquid. After you make your mix gently massage it into your skin in order to get rid of any dead skin cells and clear your pores. After that you can just rinse all the exfoliant off.

Anyways, I hope you guys will keep enjoying the awesomeness that is green tea, and if you haven't tried it yet, I hope you do!

Thursday, July 29, 2010

Food 106: Movie Night Snacks


Ever have a movie night at home with your friends? Well, a fun thing to do before the movie starts is make your own yummy snacks to satisfy your sweet tooth!

Carmel Corn

INGREDIENTS:
1/2 cup of honey
1 Tablespoon of molasses
1/2 stick of unsalted butter
1 teaspoon of vanilla
10 cups of popcorn
1/2 teaspoon of salt

INSTRUCTIONS:

1) Boil the honey, molasses, butter, vanilla, and salt in a sauce pan.
2) Toss around with the popcorn til satisfied.
3) Spread the popcorn on a rimmed baking sheet/pan.
4) Bake at 300 degrees for 10 to fifteen minutes.
5) Have popcorn completely cool.
6) If desired, you can put them into mini brown bags for friends.


Balloon Bouquet

INGREDIENTS:
Assorted jellybeans
Long wooden skewers
Shoestring licorice

INSTRUCTIONS:

1) Put jellybeans on wooden skewers til about halfway.
2) Tie together a few finished skewers with the shoestring licorice.
3) Enjoy!


Chocolate Bar Sundaes
(serves 4)

INGREDIENTS:

2 pints of vanilla ice cream
1 jar of chocolate fudge
1 cup of red skinned salted peanuts (optional)
1/4 cup of honey
Whipped cream
8 mini chocolate candy bars of your choice.

INSTRUCTIONS:

1) Get out four bowls and place a big scoop of ice cream in each.
2) Heat the fudge in the microwave for 30 seconds with lid off.
3) Sprinkle the peanuts into each jar (optional). Layer that with some fudge, then another scoop of ice cream, then one more layer of fudge.
4) Heat the honey for 15 seconds.
5) Put some whipped cream on top of each sundae and drizzle a little honey on top of that.
6) Slide two candy bars on the side.
7) Enjoy and eat quickly!

Hope I've gotten you all craving some sugar and a night with friends! You'll have a guaranteed fun night with these treats!

Thursday, July 22, 2010

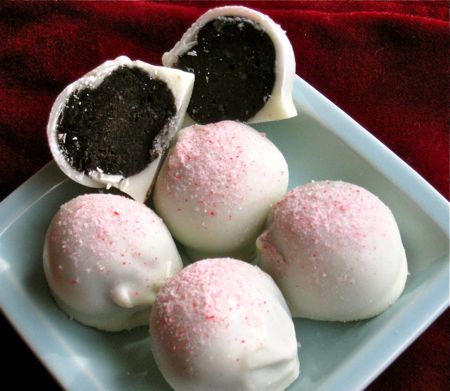
Food 105: Oreo Balls Recipe

I'm a sucker for sweets, so whenever I'm in the kitchen 55% of whatever I'm making is some sort of desert. Whenever there are fundraisers, parties, or club meetings the top requested items are Oreo balls. Unlike most treats it's very easy to make and requires only 3 ingredients!

For the materials you will need:


-microwave safe bowl


-regular large bowl


-food processor


-wooden spoon


-plastic gloves (optional)

For the ingredients you will need:


-1 package of regular oreos


-1 package of cream cheese


-1 package of white almond bark


1) In your food processor shred the oreos into a powdery substance. It's best to only do a handful of oreos at a time as opposed to the entire package at once. While you are doing this it's best to leave out the cream cheese to thaw out.


2) Carefully pour the oreo powder into the large bowl, then mix in the cream cheese with a wooden spoon or you can put on some plastic gloves and mix them with your hands. Mix until it's a thick and even consistency.


3) Form the mixture into meatball sized circles.


4) Melt the almond bark in the microwave and just follow the instructions on the package!


5) Dip and cover the entire oreo ball in almond bark, then place on parchment paper to dry. Repeat until all the oreo balls are done!

Again with these you can take as much decorating liberty as you would like! You can put them in cupcake cups, add sprinkles, glitter, decorative toothpicks, whatever you want! I hope you guys enjoy this quick and tasty treat!

Thursday, July 15, 2010

Food 104: Cold Summer Treats


It's summer time and we all know it means having fun in the sunny weather. Whether you're biking down the boardwalk or cooling off in the pool, we all wanna beat the heat. The AC in your house isn't going to cut it anymore. Here are two fun recipes that are cool both ways.


Homemade Frozen Yogurt (courtesy of Glamour)


Ingredients:
6 oz. container nonfat organic Greek yogurt
5 frozen strawberries
Sweetener (ex: agave syrup or Simplicity Sweetener)


Recipe:
1)Blend yogurt, frozen strawberries and sweetener in a blender.
2) Freeze for five to 10 minutes for thicker texture.
3) Enjoy!


Papaya Banana Smoothies:


Ingredients:

1 cup of milk

1/4 cup of Greek Yogurt
1 teaspoon of pure vanilla extract
1 small ripe banana: peeled, seeded, and sliced.
1 large papaya: peeled, seeded, and chopped.
1 cup of ice cubes


Directions
1) Combine the milk, yogurt, vanilla, banana, papaya and ice cubes in a blender and blend until smooth.
2) Pour into a large glass.
3) Enjoy!

Hopefully you'll stay cool and satisfied with these fun snacks this summer!


Thursday, July 8, 2010

Food 103: Food Failures

Let's face it. Failures happen, especially in the kitchen. According to the lady at the supermarket who was consoling me after my first kitchen failure, "If you haven't made a mistake by now, you haven't been cooking long enough."

Even professionals mess up. If you've ever watched an episode of the Food Network's "Challenge" series you know of the many cringe worthy disasters that happen often. Imagine failing on national television--- that would definitely be enough to crush my cooking spirit.

Not so long ago my friend Rebekka and I were attempting to make a birthday cake for a mutual friend of ours. It was going to be a two tier chocolate cake with cream cheese icing. While making the cake we multi-tasked by laying out in the sun and tanning. Personally, everything I did was routine and I thought everything was going ok until we ran into our first problem. We forgot to spray the pans.

Having run into this before I quickly solved the problem by taking a butter knife and running it around the edge of the cake, then I flipped the cake pan over and gently tapped the back until the cake fell out, intact. I breathed a huge sigh of relief, however it just went downhill from there.

We iced the bottom layer of the cake, and then placed the top layer on and started icing it. Then we noticed our cake starting to crack down the center. Slowly but surely it was becoming a cake replica of the Grand Canyon. We frantically tried everything to fix it including adding more icing, cooling it in the fridge while trying to brace it together, and adding even more icing. It just wasn't working.

Finally her dad walked in and told us that there was no way on earth that we could give our friend that cake. It was a complete fail.
World, meet fail cake.

This wasn't even the worst of it. In the matter of a few minutes the rift got bigger and the cake was deemed a lost cause. We then went to Wal*Mart and purchased a cake for the low trademark rollback price of $15, and our friend loved it. Maybe the sun fried our brains while we were tanning, or maybe we just weren't having a good cooking day. Who knows. The reaction we wanted to gain from our friend was still achieved, even though it was through the means of a store bought cake with a generic Happy Birthday piped on it in cursive.

By now some of you are wondering why I'm telling you about my kitchen mishap, and I just wanted to say that mistakes happen. There's no such thing as a bad cook, and if you consider yourself one, you just haven't found the right recipe yet. Since this kitchen mishap I have successfully made a carrot cake, two batches of brownies, many omelets, yummy chicken and veggie wraps, the list goes on.

According to Adam Savage of Mythbusters, "Failure is an option," even if it is in the kitchen.

Written by Liz

Thursday, July 1, 2010

Food 102: Crepes

It is finally summer for everyone and summer brings long and relaxing mornings with no pressure to go to school (well, for some of us.) Summer break is essentially a calming season full of gorgeous weather and fun days. I like to try new things during such a time, especially with cooking. I figured crepes would be the perfect way to start the day. There is something so delightful and tasty about them! I loved making them so I wanted to share with you all the recipe.

Ingredients:
  • 2 Large eggs
  • 3/4 cup milk
  • 1/2 cup water
  • 1 cup flour
  • 3 tablespoons melted butter
  • Enough solid butter to coat the pan with.
Directions:

1) Gather all your ingredients and put them in a blender.
2) Use the pulse option for 10 seconds.
3) After, place the crepe batter you just made in the refrigerator for 1 hour. I suggest you do this part the night before so you don't have to wait in the morning. This will make everything easier. NOTE: The batter can last in the fridge for up to forty-either hours so you don't have to worry about it going bad.
4) When you're ready to make them, heat a small non-stick pan and add butter to coat.
5) Pour 1 ounce of batter into the center of the pan and swirl the pan carefully so it spreads out evenly.
6) You then cook it for 30 seconds and flip. Cook for another 10 seconds and then move it to a flat surface (preferably a cutting board or plate). Lay them out flat so they can cool.
7) Repeat steps 5 and 6 until all the batter is gone.

After they have cooled off you can eat and enjoy them! But that's not it. Crepes taste great with all sorts of things. You can make them into a burrito, stick fruit inside, or you can drizzle melted chocolate on it like a dessert. Crepes also taste great with syrup, powder, you name it! It's your chance to be creative so by all means put your own twist on it! Use it in an entre or dessert. They can be stuffed with chicken, pesto, and mushrooms for a savory crepe, or for a sweet crepe they can be stuffed with fruit and cream, nutella, peanut butter and chocolate.

Hopefully I have introduced you all to something you will enjoy and make several times more!

Written by Em

Thursday, June 24, 2010

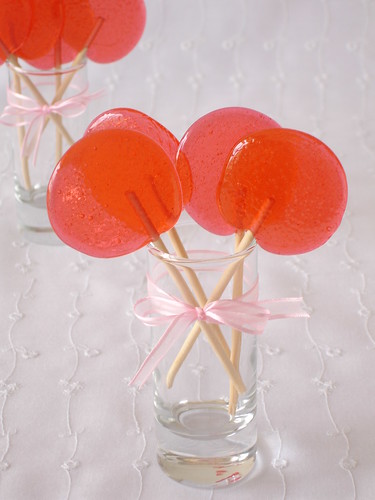
Food 101: Fakeout Lollipops

Nothing is more fun to me than pulling a prank on some friends. While some pranks are usually gross and nasty, I like to put a tasty little spin on mine. Imagine reaching for what looks like a cherry sucker only to discover it's grape! These lollipops are fun and are sure to please at parties or sleepovers.Now honestly, you don't have to follow the flavor instructions exactly, in fact you can get as creative as you want with the flavors!

For ingredients you will need:

1 cup of sugar
1/3 cup of corn syrup
1/2 cup of water
1/4 teaspoon of cream of tartar
1/2 teaspoon of the flavoring of your choice
Food coloring
Oil, or spray oil

And for those who like to set out their materials ahead of time you will need:

Lollipop sticks (skewers cut in half will also work)
Wooden Spoon
Candy Thermometer
Cookie Sheet (or a large flat surface)
Parchment paper
Pastry brush & a bowl of warm water
Heat proof measuring cup with a spout

Directions:

1) On a flat surface put a cookie sheet upside down & oil or spray the sheet and the measuring cup.
2) In a large saucepan put sugar, corn syrup, water, and cream of tartar to cook over medium heat. Stir constantly with a wooden spoon until the sugar is completely dissolved. Keep stirring for at least 5 more minutes, or until it starts to boil. In order to keep sugar crystals from forming on the pan, whip out the handy dandy pastry brush dipped in warm water and brush the sides of the pan.Stop stirring when your concoction starts to boil.
3) Carefully place the candy thermometer in the pan without touching the bottom or sides of the pan (false readings are no bueno!). Let the syrup boil for 10 minutes, or until it reaches about 300 degrees Fahrenheit.
4) Quickly remove the pan from the heat to let it cool and stop bubbling. It should be around 275 degrees Fahrenheit.
5)Add your flavoring and food coloring and stir quickly. In the prepared measuring cup place some syrup inside then pour in out on your pre-prepared parchment paper in 1/2 to 2 inch rounds. They can be any size of your choosing, but keep in mind that the bigger the lollipop the longer it takes to dry!
6) One quarter of the way up the lollipop place the stick in and twist it a little to make sure it's attached to the sucker. Cool for fifteen minutes or longer, depending on the size.
7) Decorate, or just enjoy!


Feel free to experiment a little with color and texture by adding edible glitter or swirls of other color!


Written by Liz